
Brewing your own beer at home can be an art itself. It takes a lot of time, patience and effort to get the perfect result.
There will be many times when something goes wrong, especially during the most important stage of beer brewing: fermentation.
Fermentation can be the most difficult stage in the brewing process to get right. You need to ensure that your batch is healthy, in order to achieve the perfect brew.
Brewing equipment, such as the hydrometer, can help a lot when you are a home brewer. This does not only apply to beginners, but also experienced brewing professionals.
We find out why a hydrometer is so important for your home brewing, and how to use it correctly.
What Is A Hydrometer?
A hydrometer is an essential piece of kit when you are home brewing. You need it to measure the ratio of a sample’s density compared to the density of water.
Measuring this ratio will indicate how far the yeast has converted the sugar into ethanol during the brewing process.
With a hydrometer, you can check how far along the fermentation process of your beer is, and whether the batch is healthy.
How Does A Hydrometer Work?
A hydrometer measures the exact amount of sugar in any liquid, such as beer or wine. The more sugar is present in your sample, the higher the reading on your hydrometer.
In comparison, the more alcohol can be found in your sample, the lower the reading on your hydrometer.
It’s also handy to know that the reading for water at room temperature (20 degrees Celsius) is always 1.000. With this figure, you can easily check whether your hydrometer is working correctly.
How To Use A Hydrometer For Home Beer Brewing
Using a hydrometer is much easier than you may think, and using it correctly can save you a lot of trouble down the line in your brewing process.
There are only a few steps to take when it comes to measuring whether your home brew is developing as it should.
Retrieve A Sample And Insert The Hydrometer
Take a bier thief to retrieve a sample from your wort. Transfer the liquid to a cylinder or testing jar so you can place the hydrometer correctly inside.
You should make sure that you pour enough liquid inside the testing jar to fully cover the hydrometer.
Once you have transferred the sample into your test jar, you can then insert the hydrometer into the liquid, and let it buoy for a while.
You will need to wait for the air to escape from the liquid or come to the top. Make sure that your hydrometer is centered and vertical in the jar.
This way, it will show the most accurate reading for the sample.
As a rule of thumb, you should check the sugar and alcohol level with your hydrometer for the first time before you pitch the yeast.
This very first reading after the cool down period is called the original gravity (OG), which will be the base reading for all measurements to follow.
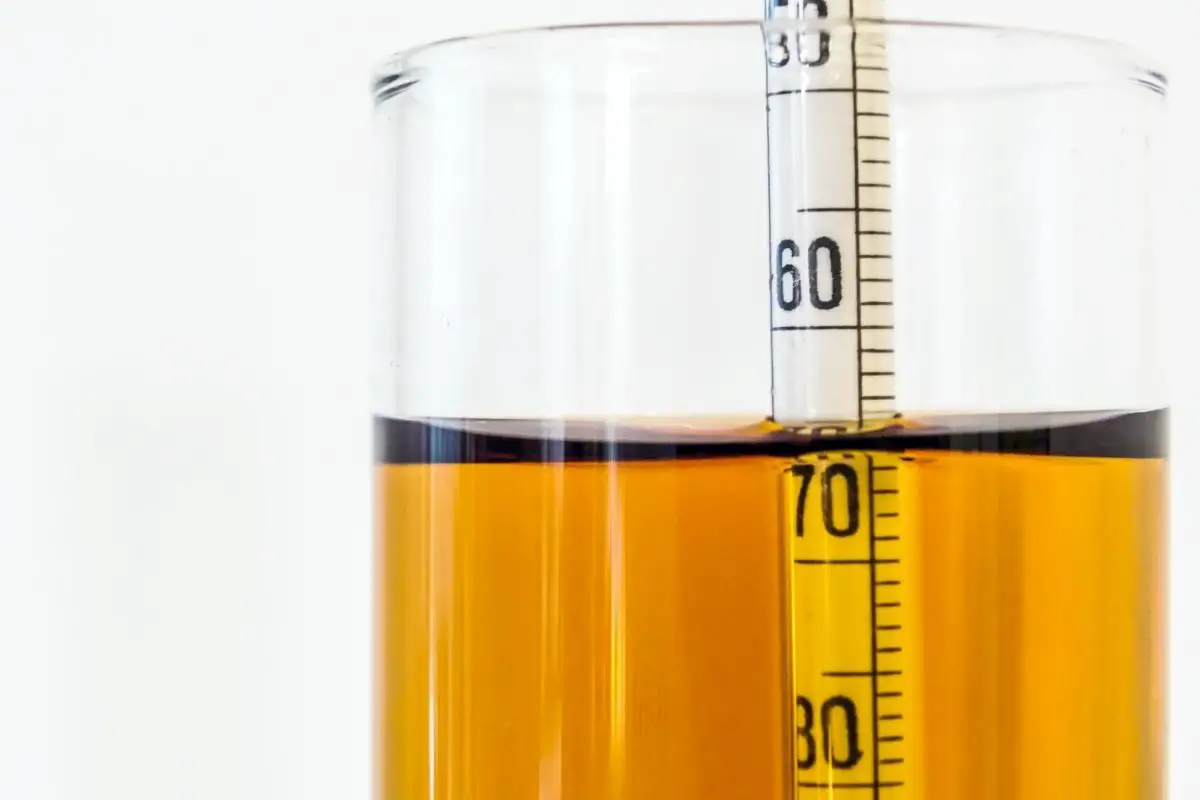
Get The Original Gravity Reading
Time to read your hydrometer! The different points on your hydrometer indicate gravity points.
Check the point where your liquid has risen to. This is your original gravity reading.
The average liquid should indicate an original gravity reading between 1.035 and 1.060. However, you should check the instructions for your brewing kit.
The manual will likely give you a more accurate reading on what you should expect for your OG.
It’s important to try to get the most accurate reading from where the liquid is exactly level. It shouldn’t be at an angle.
If you notice that the liquid is angled, then you need to center your hydrometer and ensure that it is positioned vertically in the liquid.
Calculate The Temperature
All hydrometer readings are based on a temperature of 15 degrees Celsius, so it’s essential that your wort is the correct temperature to ensure that you get an accurate reading.
If you find that your readings vary, then check the temperature, and adjust if needed.
Generally, if your temperature varies by around 5 degrees Celsius, you can either add or take off 0.001 of your hydrometer reading.
Repeat Twice
For the most accurate reading with your hydrometer, we recommend that you take several readings during the fermentation process.
This is particularly important when you come to the end of the process, as the liquid will then have turned to beer or wine rather than wort.
Your last hydrometer reading is called the final gravity reading (FG). This should be reasonably close to the final gravity reading provided in your kit’s instruction manual.
Generally, the FG of a typical beer is between 1.015 and 1.005.
How Do You Use A Hydrometer Reading To Calculate ABV?
You can work out the alcohol level of your beer by subtracting the original gravity reading from your final gravity reading.
Then divide this figure by 7.362. This will give you the ABV of your final beer.
Typical Hydrometer Errors
As mentioned in our introduction, there are a lot of mistakes you will naturally make when you just started with home brewing.
One of the biggest mistakes is not to let the wort rest by testing your brew too often.
It’s important that each time you open your batch, you will expose it to oxygen and harmful bacteria which can ruin your entire batch.
Most brewers recommend testing your home brew wort with a hydrometer only twice: before the pitching and after fermentation.
If you feel like you need to test more, then do so only with a lot of caution.
Conclusion
Making your own beer in the comfort of your home sounds like a very good idea, but it takes time and patience until you master this true art.
Remember that many beer brewers have years of experience in brewing with a range of equipment, so it’s handy to make good use of important brewing tools, such as the hydrometer.

Thus, Still Cooker was born. When I first decided that I wanted to study myself up on the consumption business, I found it so difficult to source reliable information. I had to spend all day searching for one topic on how beer was made.
As you can imagine, it was a tireless job and I came close to giving up more than once. This is the exact reason that spurred me to create this website - so that you can enjoy the ease of having all of this knowledge in one place.
I hope you’ll be able to learn as much as you want just from my website. As it grows bigger, I want it to be a single stop on your path to greatness. So, enjoy my content and try not to get drawn into a rabbit hole of how to make your own bar inventory.
- Vevor Still Instructions - June 12, 2023
- Best Proofing Parrots For Home Distilling - February 1, 2023
- What Is A Porter Beer? - June 12, 2022